Sunday, November 11, 2012

Special permissions in Workflow Create Task Activity


Many times we want to restrict a task item only to be edited by a person whom it is assigned to.

If a person has contribute access then by default there is no way that we can restrict them to update the task list item.

When you are working with create task activity and create a task, you can always create a special permission object and then assign it to the task properties.

createtaskProperties.AssignedTo = "domain\\user";
System.Collections.Specialized.HybridDictionary specialPermissions =
new System.Collections.Specialized.HybridDictionary();
specialPermissions.Add(createtaskProperties.AssignedTo,
SPRoleType.Contributor);
createTask1.SpecialPermissions = specialPermissions;

This is how you set permission on task list item to allow only assigned to person edit that task list item.

Friday, September 7, 2012

Accessing items of external list

I was working with external list and was trying to access some of the items. But then i get to know that when you want to access the list items of external list, you cannot use ID field. You need to use BdcIdentity field to work with these items.

Another point that i noted after getting those items is that you have to iterate items by using SPListItemCollection and inside that SPFieldsCollection for that item to get values of the fields. you directly cannot get the value.

I hope this helps.

Wednesday, August 29, 2012

Error occurred in deployment step 'Recycle IIS Application''

I encountered this error when I was developing an application for one of the site collection. I gave site collection URL while selecting farm solution that I was creating.

Suddenly when deploying the application through Visual Studio 2010 I encountered this error and then I came to know that this error came in because a user under which I opened the Visual Studio did not have site collection administrative permission or at least site full access.

Once I gave permission, I was able to deploy it successfully. Silly!! but sometimes it is helpful tip. Isn't it?

Friday, August 3, 2012

Refresh parent page when model dialog page is opened

When you want to refresh the parent page when user clicks on OK button on dialog page that you open from the parent page then you can use SP.UI.ModalDialog.RefreshPage


Usually we write this code in dialogReturnCallBack function.


       dialogReturnValueCallback: function(dialogResult) 
        { 
          SP.UI.ModalDialog.RefreshPage(dialogResult) 
        }

Wednesday, July 11, 2012

Creating custom workflow action for SharePoint Designer 2010


Sometimes we may require creating a custom workflow action when default activity choices offered by designer do not suffice our need.

In this post, I am going to show you how to create a custom action for designer.

You would need Visual Studio for this. So open up VS studio and select Visual C# , empty project in SharePoint 2010.

Give it a name you want.


Deploy it as a farm solution.


Now go ahead and add one more project. This time select workflow – workflow activity library.


Now add two DLL references. Microsoft.SharePoint.dll and Microsoft.SharePoint.WorkflowActions.dll

Now we are going to create three properties which will act as parameters in our custom activity. One will be the site URL, other will be Web Name and the last will be the name of the contact list.

These properties are decorated with certain attributes and declared as dependency 
properties. So go ahead and add three dependency properties.

public static DependencyProperty SiteUrlProperty = DependencyProperty.Register("SiteUrl",

        typeof(string), typeof(CreateContactListType), new PropertyMetadata(""));
        [DescriptionAttribute("Url of site where contact list will be created")]
        [BrowsableAttribute(true)]
        [DesignerSerializationVisibilityAttribute(DesignerSerializationVisibility.Visible)]
        [ValidationOption(ValidationOption.Optional)]
        public string SiteUrl
        {
            get
            {
                return ((string)(base.GetValue(CreateContactListType.SiteUrlProperty)));
            }
            set
            {
                base.SetValue(CreateContactListType.SiteUrlProperty, value);
            }
        }


        public static DependencyProperty WebNameProperty = DependencyProperty.Register("WebName",

        typeof(string), typeof(CreateContactListType), new PropertyMetadata(""));
        [DescriptionAttribute("Name for Web")]
        [BrowsableAttribute(true)]
        [DesignerSerializationVisibilityAttribute(DesignerSerializationVisibility.Visible)]
        [ValidationOption(ValidationOption.Optional)]
        public string WebName
        {
            get
            {
                return ((string)(base.GetValue(CreateContactListType.WebNameProperty)));
            }
            set
            {
                base.SetValue(CreateContactListType.WebNameProperty, value);
            }
        }


        public static DependencyProperty ContactListNameProperty = DependencyProperty.Register("ContactListName",

typeof(string), typeof(CreateContactListType), new PropertyMetadata(""));
        [DescriptionAttribute("Name for contact list")]
        [BrowsableAttribute(true)]
        [DesignerSerializationVisibilityAttribute(DesignerSerializationVisibility.Visible)]
        [ValidationOption(ValidationOption.Optional)]
        public string ContactListName
        {
            get
            {
                return ((string)(base.GetValue(CreateContactListType.ContactListNameProperty)));
            }
            set
            {
                base.SetValue(CreateContactListType.ContactListNameProperty, value);
            }
        }


Now we need to write logic in Execute method as to what needs to be done when this activity executes.
So we are going to create a contact list in specified web with specified name. Remember return  closed as that means activity has successfully completed as a status.


protected override ActivityExecutionStatus Execute(ActivityExecutionContext executionContext)
        {
            CreateContactList();
            return ActivityExecutionStatus.Closed;
        }

   private void CreateContactList()
        {
            using (SPSite oSPSite = new SPSite(SiteUrl))
            {
                using (SPWeb oSPWeb = oSPSite.AllWebs[WebName])
                {
                    Guid ContactListID = oSPWeb.Lists.Add(ContactListName, ContactListName + " Created From Designer",
        SPListTemplateType.Contacts);

                    SPList contactList = oSPWeb.Lists[ContactListID];
                    contactList.OnQuickLaunch = true;
                    contactList.Update();
                }
            }
        }

We are done with writing our code. It’s time to register the project with strong name. Go ahead in property of this project and give it a strong name.

Now right click the CustomDesignerWorkflowActivity project and add SharePoint mapped folder.


Select Template-1033-Workflow


Now we need to add .actions file which is very important from Designer stand point.

Add new item in the workflow folder and give a name as DesignerCustomActualActivity.actions
This is the file which actually tells SharePoint to make this action available in Designer.

Now add this XML in that file.

<?xml version="1.0" encoding="utf-8" ?>
<WorkflowInfo>
  <Actions Sequential="then" Parallel="and">
    <Action Name="Create Contact List"
        ClassName="DesignerCustomActualActivity.CreateContactListType"
        Assembly="DesignerCustomActualActivity, Version=1.0.0.0,
           Culture=neutral, PublicKeyToken=5e36fcb66a91895d"
        AppliesTo="all"
        Category="SPKings Activity">
      <RuleDesigner Sentence="Contact List Name %1 in %2 within site %3.">
        
        <FieldBind Field="ContactListName" Text="Contact List Name"
           DesignerType="TextArea" Id="1"/>
        
        <FieldBind Field="WebName" Text="Web Name"
           DesignerType="TextArea" Id="2"/>
        
        <FieldBind Field="SiteUrl" Text="Url of base site" Id="3"
           DesignerType="TextArea"/>
      </RuleDesigner>
      <Parameters>
        
        <Parameter Name="ContactListName" Type="System.String, mscorlib"
      Direction="In" />


        <Parameter Name="WebName" Type="System.String, mscorlib"
      Direction="In" />


        <Parameter Name="SiteUrl" Type="System.String, mscorlib"
      Direction="In" />
        
      </Parameters>
    </Action>
  </Actions>
</WorkflowInfo>


If you observe closely, we have defined action in tag and inside it we registered our assembly and defined our own category. We can have the same name in category whenever we create our custom actions so that all our custom action comes under that category.


Then we set the rule designer and in that we have bounded our all three properties with their data type. Then we set the same three as parameters as input because we will be setting the properties.

Now we need to add these into the package. So double click on the package in the project and then click on advanced.


Now add assemblies. You can get this info from GAC If you deploy this application’s DLL in GAC, from there you can get public key token information and then register it here.

If you get an access denied while dragging DLL to assembly or not able to install even through gacutil, then deploy the solution, you will get that in assembly and from there you can get it.

Just a handy tip, there is one more way to get public key token if you do not want to deploy the DLL in GAC and then get the token. Read this post.


Now one more change left and that needs to be done in web.config file of web application. Open up the web.config file of your web application from wss\virtual directory folder and find a tag Authorized Type and add our custom assembly information as mentioned below.


Now build the application and then deploy the application. It’s time to test our custom action in action and to see if it has appeared in designer.

Open designer, connect with the site. Create workflow and click on actions. Here we are with our own custom action.
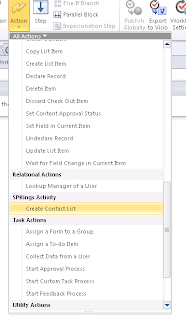


Click on the create contact list action and we get this. These come from the action file that we created.


Set up the parameters. Save and publish the workflow.

And set up a workflow to run on item adding. Add the item and see the list gets created in the web name you have mentioned in the designer. Execute method gets called when this action gets executed.


Monday, July 9, 2012

Result is out

We now have the result out and it seems like people have a big hope on Windows 8 Tablet.


Thursday, July 5, 2012

Get Public key token in Visual Studio 2010


Now when I was developing a custom application for SharePoint and needed to assign it with strong name I assigned a strong name to my project. Now was the time to see the token generated for it. I went ahead and tried to drag that assembly to GAC but I got access denied.

Development machine is Windows Server 2008. Now I tried installing it using GACUTIL but I got the same result even being the administrator of the machine.

Challenge comes in when you want to know the public key token that has been generated for the project so that you can make modification in web.config file.

So here is a solution. We will create an external command that will get us the public key token of the project. So that when that command is clicked we get to see result in command window.

Follow these simple steps. Make sure about spacing and parameters shown here.

Go to Tools menu and then external tools.


Click Add button on which the dialog opens.

Set textbox values like this


Command text box value is

C:\Program Files (x86)\Microsoft SDKs\Windows\v7.0A\Bin\NETFX 4.0 Tools\sn.exe

Click on OK.

Now when you again click on Tools menu, you get to see our command.


Click on it and we will get the result in output window and from there you get to know the public key token.


I hope this will help while you are developing any custom component in SharePoint. 

Wednesday, June 27, 2012

Creating Meeting Workspace in SharePoint 2010 from outlook 2010


With Outlook 2010, we can create meeting workspace inside SharePoint 2010 or Windows Foundation Server 2010.

In this post, I am going to show you how we can create this workspace.

First open outlook 2010 and click on create meeting.


Type the address of person, time of meeting, subject, location and a body of meeting.


From top menu, click on arrow and then click on more commands.


Find meeting workspace and add it to right and click on ok.


Then you will find an icon appeared on top bar.


Click on that icon and you will see meeting workspace task pane on right side.
Now click on change settings.


Select other from the drop down and it will ask you for a URL.


Type the URL of the parent site under which you would like to create a meeting workspace.


Click on ok twice and then click on create.

The best part is it will create the meeting workspace behind the scene and get the URL of the newly created meeting workspace right there in your outlook message with nice highlited box.


Same steps you can perform in MOSS 2007 and Outlook 2007. I hope this will help.

Friday, June 22, 2012

Generating Custom Document ID in SharePoint 2010


Earlier we saw what Document ID is. If you have not read the post about Document ID in SharePoint 2010, I would strongly recommend you reading it first before reading this post.

Once you have fair understanding on document ID, this is the next step on generating your own document ID in SharePoint 2010.

First question that comes into mind is why would we need to generate custom document ID? 

Well, the answer is simple. If you have any specific requirement to generate ID based on some department, some functions inside your organization which helps you to search for document easily plus taking an advantage of document ID feature so that even if the document is moved anywhere across the site collection, you can use the same URL that is generated for document.

First thing to note is that we need to use Microsoft.Office.DocumentManagement namespace which has a class called DocumentIdProvider.

In this class we need to override three methods and one property.

1)    GenerateDocumentId  - Method – This is the method where we will actually generate our own document ID

2)    GetDocumentUrlsById  -Method – This returns an array of URLs which points to this document.

3)    GetSampleDocumentIdText  - Method – Default Document ID value that will be shown in the search web part as a part of help.

4)    DoCustomSearchBeforeDefraultSearch – Property – If set to true, then it will call the GetDocumentURLsById method before search or if set to false, then it uses SharePoint search before custom methods.

Now let’s go ahead and create a class that inherits from DocumentIDProvider and writes these methods.

Go ahead and create a project and add a reference to DocumentManagement namespace.


And here is the entire code of the class


Note: Replace Name with Title property of web to get the title of web.

We have written code in respective methods based on the summary that we have noted earlier for each method and property above.

Now we are done with one part. Next, we need to register this custom document id with the site collection via feature. So go ahead and create a feature scoped at site collection level.


Now go ahead and add the event receivers for this feature.

Remember we would be applying our custom document ID generator when we activate this feature and when we de activate this feature we want SharePoint to use default generator back again.

So we are going to write code only in two methods activated and deactivating.


Before deploying change the property on activate feature default to false by going to the properties settings of the feature.


Now build the project and deploy the package.

Open the site and go to the site collection feature. Make sure that Document ID service feature is turned on.


Also activates the feature that we have deployed.


Now go to Document ID settings under site collection administration options.


And you will notice that it says custom document id provider has been configured for this site collection.


And there you go once you upload documents, you get new DocumentID generated by your custom code.


When you turn the feature off, it sets back to default Document ID provider.  

Monday, June 18, 2012

Why is SSP removed from SharePoint 2010


SSP is shared service provider and that was available in MOSS 2007. In MOSS days, there were certain actions that can only be performed only if you have created the SSP like the BDC and User profiles.

Now we all must be thinking that why SSP is removed from SharePoint 2010 version? Well there are many aspects to this.

First assume that you are going to have different web application and you would only need to work with BDC and do not want to use any other service that comes under BDC, but still just to use one BDC service you need to create two SSP that means two separate databases.

Another thing is in SSP we did not have items which are in similar nature. They all performed different operations.

It is little difficult to deploy the SSP on servers.

Because there are too many services in one database, so it becomes difficult to scale it. It did not support scaling as we could not add any extra service to the SSP.

Now in SharePoint 2010 SSP has been replaced by Service Applications. These services are not groups under anything, they all run independently. In other sense, service applications provide a-la-carte options to choose from. Per web application, you can configure which service you want to consume.

You can also publish these services outside of the current farm so that these services can also be used elsewhere. You need trust relationship between those farms who wants to consume these services.

You can also write your own services and add that service to this service application.
Here service applications have their own databases unlike shared database in MOSS 2007 SSP.

You can use PowerShell commands to play around with these services.

Get-SPServiceApplication returns all  service applications.
Get-SPServiceApplication-name {servicename} to get the service object.

From there you can get all other properties related to the service.

Bottom line is SSP services are now split into individual services and can be consumed from web applications as and when needed. These services are:
  • Profiles, Audiences = People Service App
  • Search = Search Service App
  • Performance Point = Performance Point Service App
  • Excel = Excel Service App
  • Office Web Applications = Office Web App
  • Visio Services = Visio Service App
  • Word = Word Service App
  • PowerPoint =  PowerPoint Service App
  • Project Server = Project Server App
Here are some new services that have been introduced in the SharePoint 2010.
  • Access Services - Allows viewing, editing and accessing Access databases in a browser.
  • Managed Metadata Service - allows access to managed taxonomy hierarchies, keywords, and social tags for site collections.
  • Secure Store Service –Provides capability to store data (e.g. credential set) securely and associate it to a specific identity or group of identities.
  • State Service - Provides temporary storage of user session data for Office SharePoint Server components.
  • Visio Graphics Service – Helps to view Visio diagrams in a web browser.
  • Word Conversion Service Application – Allows converting documents into different formats.
I hope this will give you a basic idea as to what is it that has replaced SSP and why?


Share your SharePoint Experiences with us...
As good as the SharePointKings is, we want to make it even better. One of our most valuable sources of input for our Blog Posts comes from ever enthusiastic Visitors/Readers. We welcome every Visitor/Reader to contribute their experiences with SharePoint. It may be in the form of a code stub, snippet, any tips and trick or any crazy thing you have tried with SharePoint.
Send your Articles to sharepointkings@gmail.com with your Profile Summary. We will Post them. The idea is to act as a bridge between you Readers!!!

If anyone would like to have their advertisement posted on this blog, please send us the requirement details to sharepointkings@gmail.com