


Hi all,
If you want to apply a theme to a site programmatically then the code is pretty straight forward. Have a look at it:
using (SPSite parentSite = new SPSite(SPContext.Current.Site.Url))
{
//Allow the unsafe updates in site from the current user
parentSite.AllowUnsafeUpdates = true;
using (SPWeb currentWeb = parentSite.AllWebs[SPContext.Current.Web.Name])
{
using (SPWeb childWeb = currentWeb.Webs[name])
{
childWeb.AllowUnsafeUpdates = true;
//The code line shown below will apply the theme of the parent site to the child site
childWeb.ApplyTheme(currentWeb.Theme);
childWeb.Update();
childWeb.AllowUnsafeUpdates = false;
}
}
parentSite.AllowUnsafeUpdates = false;
}
Although this code works fine when you use it for applying theme to a site which already exists in the site collection, but this may not work (atleast in my case)when i tried applying a theme to a site which i am creating programmatically.
So if you are also facing same problem then instead of applying theme just after creating the site, move the code outside the create method and take reference of the newly created site and then call the above code. It will work !
In case you are still not able to understand it then write to us at sharepointkings@gmail.com or write a comment to this post.
Wednesday, February 25, 2009
Tuesday, February 24, 2009
Handling State Machine Workflow – Part 1
Hi All,
Today we are going to discuss about state machine workflow. First question arises is what is state machine workflow and when to use state machine workflow. I will explain this entire handling of state machine in series.
Ok coming back to our question, the answer is really very simple. If your process doesn’t have sequence of activity that needs to be followed and if you have something which has specific start and ending point, then better that you go with sequential workflow else go for state machine workflow.
Let me give you an simple example where you have different statuses defines and on each status you have to perform certain actions and those statuses can be changed from time to time from different page of Sharepoint or even from any other application which uses the state machine workflow.
Other example where you have bug tracking application which doesn’t have specific ending point as far as bug is concern. Bug can be in open state then it can be in In-Progress State, it can be in submitted state, it can be re-Opened state as many states as we define, which can be in any state and can change to any state.
Changing of state is called transition between states. Transition can happen from any state to any other state which is not fixed defined. In these kinds of scenarios you can use the state machine workflow.
In this article I am not going to show you how to create state machine workflow. I will talk about how to manage state machine workflow. By manage what I mean is how you can call the state machine workflow and change the state of workflow.
State machine workflow is very different story than sequential workflow. It has got many other things.
Now assume that you have created state machine workflow and hosted on one server and your applications for Sharepoint is running on the same server. Now all applications will use this workflow for an instance. So what we have here is every application will start workflow from code let’s say depending on condition and then maintain the instance of it. You need to maintain the instance of the workflow because you also need to change the state of the same instance to the different state.
So here is a full story how you can achieve all these.
First and for most, when you are designing your state machine workflow, do not forget to add persistence service to the workflow runtime. So that you can preserve the workflow instance in the database. Persistence service helps to store the workflow instance in the database when workflow goes idle.
Go to this location. Location may differ from machine to machine depending on framework.
C:\WINDOWS\Microsoft.NET\Framework\v3.0\Windows Workflow Foundation\SQL\EN.
Here you will find four SQL scripts that you need to run against your SQL server database which you want to connect your application with. One is for tracking service and the other is for persistence service.
So Create one database for workflow store because you need to preserve the instances of your state machine workflow in this database and later you need to retrieve this same instance back to the application for further application.
Now run those scripts against the database. First run Schema files and then run logic files.
This way you are ready with the database that can store the workflow instances. The mail reason to store the workflow instances in the database is that it is not a good practice to store long running workflows in memory. Better that we unload that instance and store it in database so it free the memory and when required, load that instance from the database again and then perform the operation and then again unload it.
Now you also have to add ExternalDataExchangeService service if you are familier with State machine workflow, because this services handles the call between client application and workflow host application for data exchange.
Now once you have the database setup for it, it’s time to add the persistence service to the workflow runtime and data exchange service.
This way we can add both services to the workflow runtime. In my second part i will continue explaining how we can go ahead with taking instances on hand and move state machine workflow ahead.
Today we are going to discuss about state machine workflow. First question arises is what is state machine workflow and when to use state machine workflow. I will explain this entire handling of state machine in series.
Ok coming back to our question, the answer is really very simple. If your process doesn’t have sequence of activity that needs to be followed and if you have something which has specific start and ending point, then better that you go with sequential workflow else go for state machine workflow.
Let me give you an simple example where you have different statuses defines and on each status you have to perform certain actions and those statuses can be changed from time to time from different page of Sharepoint or even from any other application which uses the state machine workflow.
Other example where you have bug tracking application which doesn’t have specific ending point as far as bug is concern. Bug can be in open state then it can be in In-Progress State, it can be in submitted state, it can be re-Opened state as many states as we define, which can be in any state and can change to any state.
Changing of state is called transition between states. Transition can happen from any state to any other state which is not fixed defined. In these kinds of scenarios you can use the state machine workflow.
In this article I am not going to show you how to create state machine workflow. I will talk about how to manage state machine workflow. By manage what I mean is how you can call the state machine workflow and change the state of workflow.
State machine workflow is very different story than sequential workflow. It has got many other things.
Now assume that you have created state machine workflow and hosted on one server and your applications for Sharepoint is running on the same server. Now all applications will use this workflow for an instance. So what we have here is every application will start workflow from code let’s say depending on condition and then maintain the instance of it. You need to maintain the instance of the workflow because you also need to change the state of the same instance to the different state.
So here is a full story how you can achieve all these.
First and for most, when you are designing your state machine workflow, do not forget to add persistence service to the workflow runtime. So that you can preserve the workflow instance in the database. Persistence service helps to store the workflow instance in the database when workflow goes idle.
Go to this location. Location may differ from machine to machine depending on framework.
C:\WINDOWS\Microsoft.NET\Framework\v3.0\Windows Workflow Foundation\SQL\EN.
Here you will find four SQL scripts that you need to run against your SQL server database which you want to connect your application with. One is for tracking service and the other is for persistence service.
So Create one database for workflow store because you need to preserve the instances of your state machine workflow in this database and later you need to retrieve this same instance back to the application for further application.
Now run those scripts against the database. First run Schema files and then run logic files.
This way you are ready with the database that can store the workflow instances. The mail reason to store the workflow instances in the database is that it is not a good practice to store long running workflows in memory. Better that we unload that instance and store it in database so it free the memory and when required, load that instance from the database again and then perform the operation and then again unload it.
Now you also have to add ExternalDataExchangeService service if you are familier with State machine workflow, because this services handles the call between client application and workflow host application for data exchange.
Now once you have the database setup for it, it’s time to add the persistence service to the workflow runtime and data exchange service.
WorkflowRuntime workflowRuntime = null;
workflowRuntime = new WorkflowRuntime();
string strWorkflowConnectionString = string.Empty;
strWorkflowConnectionString =
ConfigurationManager.ConnectionStrings[“connectionstringname”].ConnectionString;
workflowRuntime.AddService(new SqlWorkflowPersistenceService(strWorkflowConnectionString));
ExternalDataExchangeService dataExchange;
dataExchange = new ExternalDataExchangeService();
workflowRuntime.AddService(dataExchange);
objService = new SupplierService();
dataExchange.AddService(objService);
workflowRuntime.StartRuntime();
This way we can add both services to the workflow runtime. In my second part i will continue explaining how we can go ahead with taking instances on hand and move state machine workflow ahead.
Friday, February 20, 2009
using SPListItem.UpdateOverwriteVersion
Hi All,
Today we are going to discuss something about UpdateOverwriteVersion on SPListItem.
When you have versioning enabled on document library or list and when you do not want to create a new version even you are updating an item in the list or document library at that time you can use this method because Update will create version for the item.
Many times i also found that in workflow when you want to update any item on which workflow is running and if you use Update method on the SPListItem, it throws Error in terms on Error Starting in Workflow. When i use this UpdateOverwriteVersion, it didn't give me.
With the help of this method, you can also set certain properties like Author, Editor and Modified. Remember you need to change both Author as well as Editor on these properties to take effect.
Example :
using (SPSite objSite = new SPSite("http://server/"))
{
using (SPWeb objWeb = objSite.OpenWeb())
{
SPList objDocLib = objWeb.Lists["Shared Documents"];
SPListItem objItem = objDocLib.Items[0];
objItem ["Created"] = new DateTime(2008, 5, 5);
objItem ["Author"] = "{author}";
objItem ["Editor"] = "{editor}";
objItem ["Modified"] = new DateTime(2008, 5, 6);
objItem.UpdateOverwriteVersion();
}
}
That’s it.
Sunday, February 15, 2009
SharePoint Confusion.
Dear Readers,
As you know we all are using SharePoint since a long time now.
But still we are confused with a simple point.
What to use while SharePoint Development?
we have a simple scenario(s).
Scenario 1:
We are storing data in the list. You can consider that data is for Order List.
There are multiple people or group working on that order and we want to map that.
Now if we want to achieve this functionality in standard web application then we store order items in one table and number of people or group working on that order stored in another table with OrderID (Multiple rows). And fetch information with inner join.
But same thing if we want to go for SharePoint then we have two ways
1) Create another list and store Order List Item id (Lookup or manually maintained) with people or group working on that order. So this will work like two tables.
2) Create another Column in order list with people picker in same order list with multiple selections. So we can figure out how many people are working in the same order.
Now functionality wise both the way is fine.
But which will be the best way?
Simply saying we don’t have an answer.
We used both in different application but won’t find difference (till now).
But both the case has its own positive and negative point.
In one every time we need to have instantiate extra list object and fetch data and in another we can reach the limitation maximum number of user in a column. (No limit has been defined but we had not tried 1000+ different user in same people picker) and find specific one by looping with “;#” separation or ID separation.
So we want your inputs if any one facing any problem and solved it by any way Or we are sure that every one has this kind if confusion which will be better for longer run Or these kinds of scenario then share that with us and all the reader so that every one will be benefited.
We will update more such scenario(s) soon and also update your scenario(s).
Friday, February 6, 2009
Geting SharePoint web service response in DataTable c#
Hi all,
Few days before I was exploring how to get SharePoint web service response in DataTable instead of XMLNode?. for example you are using SharePoint List.asmx web service and try to get all SharePoint List collection get this response in DataTable.
here is code snippet.
Few days before I was exploring how to get SharePoint web service response in DataTable instead of XMLNode?. for example you are using SharePoint List.asmx web service and try to get all SharePoint List collection get this response in DataTable.
here is code snippet.
/// <summary>
/// Get SharePoint List collections using SharePoint web service
/// Instead of Xml response it return DataTable.
/// remove XML name space from web service response.
/// </summary>
/// <returns></returns>
public DataTable GetSharePointListCollection()
{
try
{
//ListService is SharePoint List.asmx List Instance.
XmlNode ndSPLists = ListService.GetListCollection();
//to remove xml Name spance.
Regex StripXmlnsRegex =new Regex(@"(xmlns:?[^=]*=[""][^""]*[""])",RegexOptions.IgnoreCase|RegexOptions.Multiline|RegexOptions.Compiled| RegexOptions.CultureInvariant);
//to find and replace short XmlNameSpace like z:,rs: from xmlresponse by GetListItems method
Regex removeShortNameSpace = new Regex(@"(?<lessthan><)(?<closetag>[/])?(?<shortname>\w+:)\s*", RegexOptions.IgnoreCase|RegexOptions.Multiline|RegexOptions.Compiled|RegexOptions.CultureInvariant);
//remove namespace xmlnls from result xml..
string xmlResponse = StripXmlnsRegex.Replace(ndSPLists.InnerXml, "");
//find and replace short XmlNameSpace like z:,rs: from responce with space..
xmlResponse = removeShortNameSpace.Replace(xmlResponse, delegate(Match m)
{
Group closetag = m.Groups["closetag"];
if (closetag.Length != 0)
{
return "</";
}
else
{
return "<";
}
});
//load xml from removed XmlNameSpace and short name of XmlNameSpace..
//XDocument xmlDoc = new XDocument();
//xmlDoc = XDocument.Parse(xmlResponse);
xmlResponse = "<Lists>" + xmlResponse + "</Lists>";
XDocument xdoc = XDocument.Parse(xmlResponse);
using (StringReader reader = new StringReader(xdoc.ToString()))
{
DataSet dsSPLists = new DataSet();
dsSPLists.ReadXml(reader);
if (dsSPLists.Tables.Count > 0)
{
return dsSPLists.Tables[0];
}
}
return null;
}
catch
{
throw;
}
}
create a site programmatically in moss
Hi All,
Sometimes we often requires to create a site programmatically in code.
So here is a simple way we can create any site from code.
for that first you need to gain an access on Web or Site under which you want to create your site.
so i am writing a code in webpart just to demonstrate you the things, you can change the code accordingly where ever you are writing your code like in event handler or feature receiver.
Let us understand the parameters for this.
There are three overload for creating site. First overload simply give the name of the site that you want to create which does not give us much flexibility.
Rest two overloaded method has only one difference. Difference is of specifying the site template. you want to use team site, blank site, wiki, blog. What kind of a site you want to create goes here.
So one overloaded method with the SPWEbTemplate uses enumerations to choose from and the other overload which gives you an option to write down String for site template.
Now here is a list of Strings that you can place in the parameter as in the example it is STS#0 for Team Site.
STS#0 Team Site
STS#1 Blank Site
STS#2 Document Workspace
MPS#0 Basic Meeting Workspace
MPS#1 Blank Meeting Workspace
MPS#2 Decision Meeting Workspace
MPS#3 Social Meeting Workspace
MPS#4 Multipage Meeting Workspace
WIKI#0 Wiki
BLOG#0 Blog
and these are additional web template IDs
BDR#0 Document center—A central document management location for an enterprise
OFFILE#0 Records center—A central location in which records
OFFILE#1 managers can define routes for incoming files
CMSPUBLISHING#0 Publishing site
BLANKINTERNET#0 Publishing site—A site for publishing web pages on a schedule with workflow features enabled
BLANKINTERNET#1 Press releases site
BLANKINTERNET#2 Publishing site with workflow—A publishing site for web pages using approval workflows
SPSNHOME#0 A site for publishing news and articles
SPSREPORTCENTER#0 Report center—A site for creating, managing, and delivering web pages, dashboards, and Key Performance Indicators (KPIs)
SPSPORTAL#0 A starter hierarchy for an intranet divisional portal
PROFILES#0 A profile site that includes page layouts with zones
BLANKINTERNETCONTAINER#0 Publishing portal—a site collection preconfigured for revision-controlled, secure content creation and publication
SPSMYSITEHOST#0 My Site host—keep in mind that only one of these can be provisioned per Shared Services Provider
SRCHCENTERLITE#0 Search center—A site designed to deliver the search query and results experience
SRCHCENTERLITE#1 Search center—A superset of the previous; does not appear in navigation bars
These are the available templates.
1033 is for site in English language.
That's it. Your job is done. you have created site dynamically.
Sometimes we often requires to create a site programmatically in code.
So here is a simple way we can create any site from code.
for that first you need to gain an access on Web or Site under which you want to create your site.
so i am writing a code in webpart just to demonstrate you the things, you can change the code accordingly where ever you are writing your code like in event handler or feature receiver.
SPContext.Current.Web.AllowUnsafeUpdates = true;
SPWebCollection objWebs = SPContext.Current.Web.Webs;
objWebs.Add("GAME ZONE", "Games Site", "This is the Games Site", 1033,"STS#0", true, false);
SPContext.Current.Web.AllowUnsafeUpdates = false;
Let us understand the parameters for this.
There are three overload for creating site. First overload simply give the name of the site that you want to create which does not give us much flexibility.
Rest two overloaded method has only one difference. Difference is of specifying the site template. you want to use team site, blank site, wiki, blog. What kind of a site you want to create goes here.
So one overloaded method with the SPWEbTemplate uses enumerations to choose from and the other overload which gives you an option to write down String for site template.
Now here is a list of Strings that you can place in the parameter as in the example it is STS#0 for Team Site.
STS#0 Team Site
STS#1 Blank Site
STS#2 Document Workspace
MPS#0 Basic Meeting Workspace
MPS#1 Blank Meeting Workspace
MPS#2 Decision Meeting Workspace
MPS#3 Social Meeting Workspace
MPS#4 Multipage Meeting Workspace
WIKI#0 Wiki
BLOG#0 Blog
and these are additional web template IDs
BDR#0 Document center—A central document management location for an enterprise
OFFILE#0 Records center—A central location in which records
OFFILE#1 managers can define routes for incoming files
CMSPUBLISHING#0 Publishing site
BLANKINTERNET#0 Publishing site—A site for publishing web pages on a schedule with workflow features enabled
BLANKINTERNET#1 Press releases site
BLANKINTERNET#2 Publishing site with workflow—A publishing site for web pages using approval workflows
SPSNHOME#0 A site for publishing news and articles
SPSREPORTCENTER#0 Report center—A site for creating, managing, and delivering web pages, dashboards, and Key Performance Indicators (KPIs)
SPSPORTAL#0 A starter hierarchy for an intranet divisional portal
PROFILES#0 A profile site that includes page layouts with zones
BLANKINTERNETCONTAINER#0 Publishing portal—a site collection preconfigured for revision-controlled, secure content creation and publication
SPSMYSITEHOST#0 My Site host—keep in mind that only one of these can be provisioned per Shared Services Provider
SRCHCENTERLITE#0 Search center—A site designed to deliver the search query and results experience
SRCHCENTERLITE#1 Search center—A superset of the previous; does not appear in navigation bars
These are the available templates.
1033 is for site in English language.
That's it. Your job is done. you have created site dynamically.
Thursday, February 5, 2009
Changing Home page Default.aspx programmatically in moss
Hi All,
Whenever we enter the URL in address bar of the browser for moss site, it automatically redirects to the Default.apsx. If we want user to go to some different page in the site.
so here is the code we write for that.
I am changing this in webpart so i am writing this code in webpart page. it is possible to have this code in Feature.
Now when the user will hit the URL, it will automatically redirected to Shared Documents AllItems.aspx
That's it. you are done with this.
Whenever we enter the URL in address bar of the browser for moss site, it automatically redirects to the Default.apsx. If we want user to go to some different page in the site.
so here is the code we write for that.
I am changing this in webpart so i am writing this code in webpart page. it is possible to have this code in Feature.
SPContext.Current.Web.AllowUnsafeUpdates = true;
SPFolder objFolder = SPContext.Current.Web.RootFolder;
objFolder.WelcomePage = "Shared%20Documents/Forms/AllItems.aspx";
objFolder.Update();
SPContext.Current.Web.AllowUnsafeUpdates = false;
Now when the user will hit the URL, it will automatically redirected to Shared Documents AllItems.aspx
That's it. you are done with this.
Wednesday, February 4, 2009
How to get the Webpart XML programmatically in moss
Hi All,
Today we are going to discuss about the getting XML of the web part programmatically in moss.
Whenever we want to place webpart as a feature on any page as part of deployment, we need to place the webpart XML under AllUserWebPart tag.
So here is a way to get the XML of any webpart from webpart gallery.
Go to top level site settings, under galleries go to web parts, select your webpart of which you want to view XML. Let’s say we want to see AdvanceSearchBox webpart’s XML.
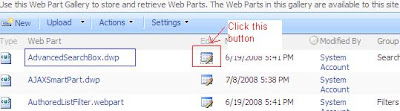
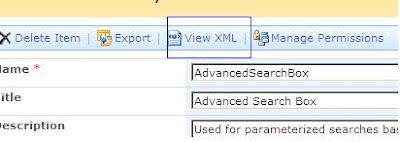
Once you click there, you’ll be redirected to a page. Click on ViewXML button, that will take you to the XML that we want actually get.
Ok, this is way how we can get the XML of the webpart from using Sharepoint.
Now the same functionality we want to achieve through the coding and this is what the article is all about.
Here what we do is we first get a reference of webpart galleries because all webparts used in entire site will be there in the web part galleries.
First we will write down the SPQuery which will be fetching the actual webpart which is passed as parameter from the webpart galleries.
Then we will take up the GetCatelog method to return the webpart gallery which is again kind of a list.
Then we will simply fire query with the SPQuery’s object and get the SPListItemCollections and then using the BinaryStream we will take out the XML.
Ok , so without talking much let’s write down the code, you may write a function to have two parameters which are Web object and Webpart name and return XMLreader and then play with XMLReader. Here just for demo purpose I am writing a code in a webpart.
This code demonstrates looping through entire webpart collections and getting their XML representation.
Now once you have the objDoc in your hand, just take out the InnerXML of that and there you go, you have your Webpart XML in your hand.
That’s it. Your job is done.
Today we are going to discuss about the getting XML of the web part programmatically in moss.
Whenever we want to place webpart as a feature on any page as part of deployment, we need to place the webpart XML under AllUserWebPart tag.
So here is a way to get the XML of any webpart from webpart gallery.
Go to top level site settings, under galleries go to web parts, select your webpart of which you want to view XML. Let’s say we want to see AdvanceSearchBox webpart’s XML.

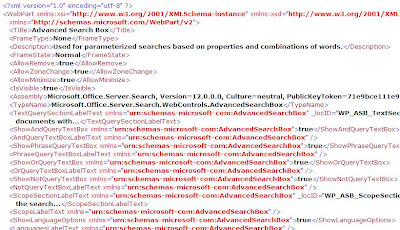
Once you click there, you’ll be redirected to a page. Click on ViewXML button, that will take you to the XML that we want actually get.


Ok, this is way how we can get the XML of the webpart from using Sharepoint.
Now the same functionality we want to achieve through the coding and this is what the article is all about.
Here what we do is we first get a reference of webpart galleries because all webparts used in entire site will be there in the web part galleries.
First we will write down the SPQuery which will be fetching the actual webpart which is passed as parameter from the webpart galleries.
Then we will take up the GetCatelog method to return the webpart gallery which is again kind of a list.
Then we will simply fire query with the SPQuery’s object and get the SPListItemCollections and then using the BinaryStream we will take out the XML.
Ok , so without talking much let’s write down the code, you may write a function to have two parameters which are Web object and Webpart name and return XMLreader and then play with XMLReader. Here just for demo purpose I am writing a code in a webpart.
This code demonstrates looping through entire webpart collections and getting their XML representation.
System.Xml.XmlReader objXMLReader = null;
SPQuery objQuery = new SPQuery();
//Initialize Query to get all record from the webpart gallery, so
//query like where ID > 0
objQuery.Query = "<Where><Gt><FieldRef Name=\"ID\"/><Value Type=\"Counter\">0</Value></Gt></Where>";
//Consider your parent site accordingly,
//I am one level down to the parent site so I am referring like this
//if you are at top level site, ignore ParentWeb.
SPList objWebParts =objWeb.ParentWeb.GetCatalog(SPListTemplateType.WebPartCatalog);
SPListItemCollection objColl = objWebParts.GetItems(objQuery);
if (objColl.Count > 0)
{
System.Xml.XmlDocument objDoc = null;
foreach (SPListItem objItem in objColl)
{
Stream objStream = objItem.File.OpenBinaryStream();
StreamReader objReader = new StreamReader(objStream);
StringReader objStringReader = new StringReader(objReader.ReadToEnd());
objXMLReader = System.Xml.XmlReader.Create(objStringReader);
objDoc = new System.Xml.XmlDocument();
objDoc.Load(objXMLReader);
}
}
Now once you have the objDoc in your hand, just take out the InnerXML of that and there you go, you have your Webpart XML in your hand.
That’s it. Your job is done.
Tuesday, February 3, 2009
Creating a top link bar navigation in MOSS site programmatically
Hi All,
If we want to add top link navigation bar programmatically in our site, we can do it with programmatic support also.
First let’s have a look at from where we can do it from GUI.
Go to Site Settings-> under look and feel -> Navigation, in that point to Global Navigation and add Heading and write it down the address and other information. Once you are done with it, you can see new Tab coming up at top navigation bar and once you click on that, it will take you to the your provided address.
So the question is now how to do it programmatically. Here is the answer for that.
Here is a way. We have to get TopNavigationBar of the site first.
Let’s have a look at the demo code.
SPWeb objWeb = SPContext.Current.Web;
SPNavigationNodeCollection topNavigationNodes = objWeb.Navigation.TopNavigationBar;
This gives us the collection of all top navigation node of the site.
Now we want to add one more navigation bar to it.
SPNavigationNode objItem = new SPNavigationNode(“{Caption}”, “{URL}”, false);
And then finally add it to the Collection. Here we have a choices. Like simply add, addAsFirst, AddAsLast. Here we will add link as First.
topNavigationNodes.AddAsFirst(objItem);
objWeb.Update();
That’s it. You are done.
Now when you run the code, you can see one more link coming up at the top navigation bar and when you click there it will take you to the page mentioned by you in the URL parameter.
Monday, February 2, 2009
Creating custom permission level in moss
Hi All,
Today we are going to create a custom Permission level for the site.
It is very simple process of understanding the SPRoleDefinition.
Assume that currentWeb is an instance of SPWeb and where in you want to create custom permission level, then write down this code.
currentWeb.AllowUnsafeUpdates = true;
SPRoleDefinition roleDefinition = new SPRoleDefinition();
roleDefinition.Name = "Custom Permission";
And then start giving all permisions that you want to give.
roleDefinition.BasePermissions =
SPBasePermissions.ManageLists
| SPBasePermissions.AddListItems
| SPBasePermissions.EditListItems
| SPBasePermissions.DeleteListItems
| SPBasePermissions.ViewListItems
| SPBasePermissions.ApproveItems
| SPBasePermissions.OpenItems
| SPBasePermissions.ViewVersions
| SPBasePermissions.DeleteVersions
| SPBasePermissions.CreateAlerts
| SPBasePermissions.ViewFormPages
| SPBasePermissions.ViewPages
| SPBasePermissions.ManagePermissions
| SPBasePermissions.EnumeratePermissions;
These permission are same as that we find in Site Settings->Permissions->Permission levels which is at _layouts/role.aspx location of the site.
You can get each and every permission enumeration here in SPBasePermissions. Every permission that you see on _layouts/role.aspx page is there in SPBasePermissions enumeration.
Once you do that all that remains is just add this SProleDenifition to the web.
currentWeb.RoleDefinitions.Add(roleDefinition);
currentWeb.AllowUnsafeUpdates = false;
That's it. you are done. When you open this permission set named "Custom Permission", you can see those options are by default selected for which you have given permission from code.
Subscribe to:
Posts (Atom)